Learn How to Hire & Onboard with Gusto
To make the hiring and onboarding process simple and efficient, we've curated FAQs and helpful links to guide you through each step. Visit Gusto’s Hiring and Onboarding Support Hub for additional resources and helpful articles!
Gusto
FAQs
-
An applicant's scorecard is always visible to admins and team members involved in the hiring process, no matter the candidate's status (interviewing, hired, or rejected). Other admins are only able to see scorecards if they had admin permissions before it was scored.
Go to Hiring.
Find the "Gusto Recruiting" section and click See details.
Click the title of the job post.
Click the Applicants tab.
Click the name of the applicant, or View from the “Actions” column, to view the applicant’s submission.
If you added the applicant manually from another source, you can edit the application by clicking Edit applicant in the top-right of the page.
Review their email, additional information, and cover letter and resume (if required)
If desired, leave a comment on the right-hand side of the page by entering some text and clicking Save comment.
Comments will save to the application itself and be visible to all others who can review the application (admins and any hiring team members)
To move a candidate to a different stage, click:
Advance [name], to:
Advance to interviewing—allows anyone on the hiring team to submit a scorecard for the candidate.
Hire them—sends you to the onboarding experience.
Reject [name], to:
Reject application
We will not notify the candidate that they’ve been rejected—if you’d like to let them know, communicate with them on their own.
Application dropped out
Gusto will not send any communication to the candidate.
Job postings will remain “open” and publicly accessible until you manually remove the posting. More information how to remove a job posting can be found below.
Click Submit.
Check the “status” column to check where each candidate is in the recruiting cycle.
-
After advancing an applicant from Gusto Recruiting:
Enter the new team member's info:
Full name
Preferred first name (optional). Gusto will use this name to refer to this person in communications where their legal first name is not required (such as in the offer letter, onboarding emails, org chart, etc.).
Country
Worker type
Personal email. If the new employee does not have an email, this field may be optional if you're not sending them an offer letter or background check request through Gusto. You must use an email address that’s not associated with another employee at your company.
Hiring options: This is where you can choose to send an offer letter or request a background check.
Click Save and continue.
Fill out the employee's work info:
Work location (address)
Work state
Job title (optional): Select one or scroll to the bottom of the list and click Create a new job title.
Start date: If you have benefits, this date also determines your employee's health coverage effective date based on the waiting period you selected during onboarding.
Department: Select one or scroll to the bottom of the list and click Create a new department.
Manager (optional). If this is the first direct report for a new manager, leave this field blank for now. You can later go to the new manager's profile to add the direct report.
Click Save and continue.
Add their compensation details:
Employee type (e.g. salary, hourly, overtime-eligible, etc. Gusto does not currently support paying employees by piece rate—per visit, per bundle, per package)
Compensation amount
Employment status: This determines their benefits eligibility, if you offer benefits with Gusto.
Any special tax exemption status, if applicable.
Click Save and continue.
Review the new team member's info. Click Edit to change an employee’s work information if any corrections or updates are necessary.
Once complete, save your work:
Add [name] and exit:You'll be returned to the Team members page, where you can view the new employee's status and checklist under the Onboarding tab.
Add [name] and set up for payroll: You'll be taken to the Add to payroll task on their onboarding checklist.
After you add the new employee to payroll, Gusto will email them an invitation to set up their account and complete their onboarding tasks. If you offer benefits with Gusto, they'll be automatically invited to enroll in benefits once their new hire waiting period is complete.
-
If you're looking to send an offer letter to a new hire, you can do so when adding them to Gusto.
Once you’ve extended an offer to a prospective employee, Gusto will keep track of those offers and their status. To review offers—past and pending—follow these steps:
Go to the Hiring section.
Next to "Offer letters" click See details.
There are four different status types for offer letters. You will see which ones are applicable to your company at any given time.
Not sent
Offers that you have started but not yet completed. You may Update & Send or Delete these offers.
Sent
Offers that have been sent and are pending a decision. You may View, Update, or Rescind these offers.
Accepted
Offers that have been sent and signed. You may View or Download these offers.
Expired/Rescinded
Offers that you sent but were not accepted, either because you rescinded them or they expired before being signed.
To rescind an offer, click the Actions menu next to the employee's name and select Rescind offer. We will not notify the candidate that the offer was rescinded, but they will not be able to read or sign the letter.
Note: Resending an offer letter is not currently supported. If you need to resend or edit an existing offer letter, you'll need to send a brand new offer letter.
-
If the offer letter has not been sent
Go to the Hiring section.
Next to "Offer letters" click See details.
To the right of the employee’s name, select the symbol under the "Actions" column.
Click Update & finish.
Make the desired changes and submit.
If the offer letter has already been sent
Go to the Hiring section.
Next to "Offer letters" click See details.
To the right of the employee’s name, select the symbol under the "Actions" column.
Select Update offer.
This will void the original offer letter link sent to the employee.
Click Yes, I need to update this offer.
This will move the employee’s name under the "Not Sent" header.
To the right of the employee’s name, select the symbol under Actions.
Click Update & finish.
Make the desired changes and submit.
If the offer letter has already been signed by the employee
Once an offer letter has been signed by an employee, it cannot be edited or deleted from the employee’s account. You'll need to have the employee sign a new offer letter outside of Gusto. You can then upload this to the Documents tab of the employee’s profile.
-
Once you've hired an employee, the next step is to add them to payroll. In the Team members section, click their name to get started. Here you can also review their onboarding checklist.
Enter the employee's personal email.
Check the box Invite this employee to enter their own details online if you want them to self-onboard. Once they're done, you'll be notified so you can approve the details and get them on payroll. Uncheck the box if you want to enter all of your employee’s personal, tax, and payment details to bring them on board. Make sure to complete Form I-9.
If you're located in a state that requires use of e-Verify for some or all employers, complete e-Verify.
States with e-Verify enrollment requirements for some or all employers, as of Jan. 1, 2024: Alabama, Arizona, Colorado, Florida, Georgia, Idaho, Indiana, Louisiana, Michigan, Minnesota, Mississippi, Missouri, Nebraska, North Carolina, Oklahoma, Pennsylvania, South Carolina, Tennessee, Texas, Utah, Virginia, and West Virginia.
Check your state and local legal resources for up-to-date information.
If you've set up time off policies, you can assign them to the employee here.
Click Save & continue.
If you chose not to have the employee self-onboard, you're prompted to fill out their withholding info.
Select whether you'd like Gusto to file a new hire report or if you've already filed it yourself.
Click Save & continue.
If you chose not to have the employee self-onboard, you're prompted to fill out their payment method info.
Choose which documents you'd like your employee to have during onboarding and click Save & continue.
We'll include the following documents automatically:
Federal Form W-4: Employee Tax Withholding
Employee Direct Deposit Authorization
Employment eligibility Form I-9*
*Only available for employees who self-onboard. If you entered their details for them, they'll need to complete Form I-9 outside of Gusto.
Other forms you may need:
State Form W-4 (if required)
Non-resident certificate—for employees living and working in two different states
Customize the employee's welcome options and click Save & continue.
Email an I-9 reminder (if completing through Gusto)
Add a welcome note
Create a digital card for the rest of your team to sign—team members will be invited to sign the card one week before the new employee's start date.
If the start date is sooner than one week away, the card sends immediately.
Review the onboarding timeline for your new employee and click Send invitation. On the next page, you'll see their onboarding checklist to review and complete other tasks as needed.
-
Resend the welcome email
Click the People section and select Team members.
Choose Onboarding team members.
If your teammate is already in the “Active” tab and has not received a welcome email yet, they can sign in using the email connected to their Gusto account and follow the "forgot password" troubleshooting instructions to reset their password.
Find the team member's name and click the actions menu.
Click Send a reminder.
This option will only be available if self-onboarding has not already been started.
-
After you’ve hired a new employee, you can view and complete their onboarding checklist from the People section of your admin account.
Sign in to your Gusto admin account.
Choose Onboarding team members. This tab lists your team members who are not yet added to payroll.
Click the name of the team member whose checklist you want to view.
If the team member is self-onboarding, hover over "Invitation sent" to check the status.
From here, you can view and manage tasks. Some tasks (like filling out the I-9) cannot be deleted because they’re required by law. If a task becomes overdue, it's labeled on the checklist and primary admins receive an email.
Note: If you sent a new hire an offer letter through Gusto, their onboarding checklist does not appear until they sign the offer. If needed, you can resend the welcome email.
-
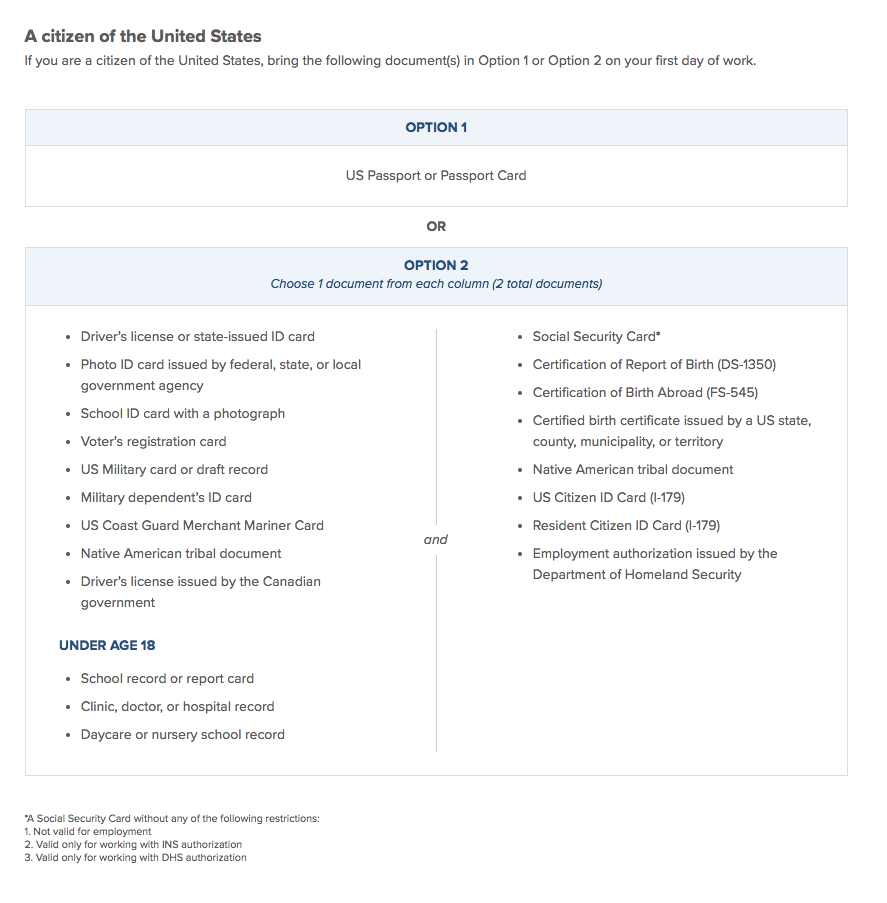
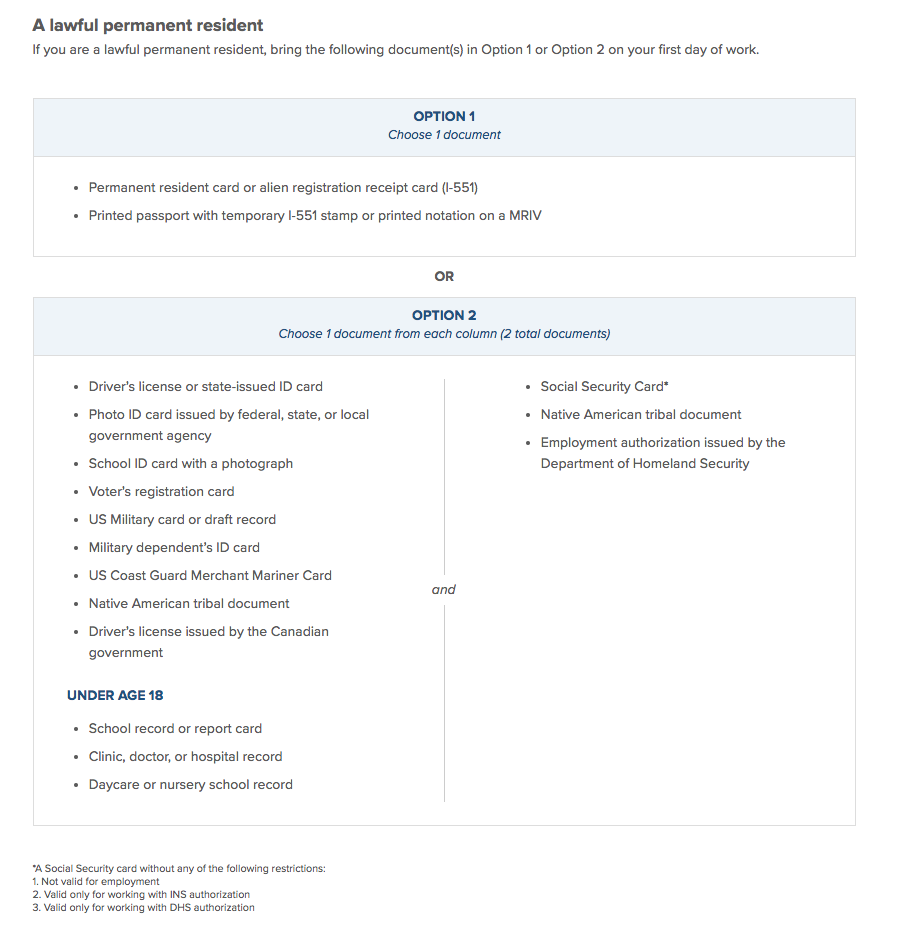
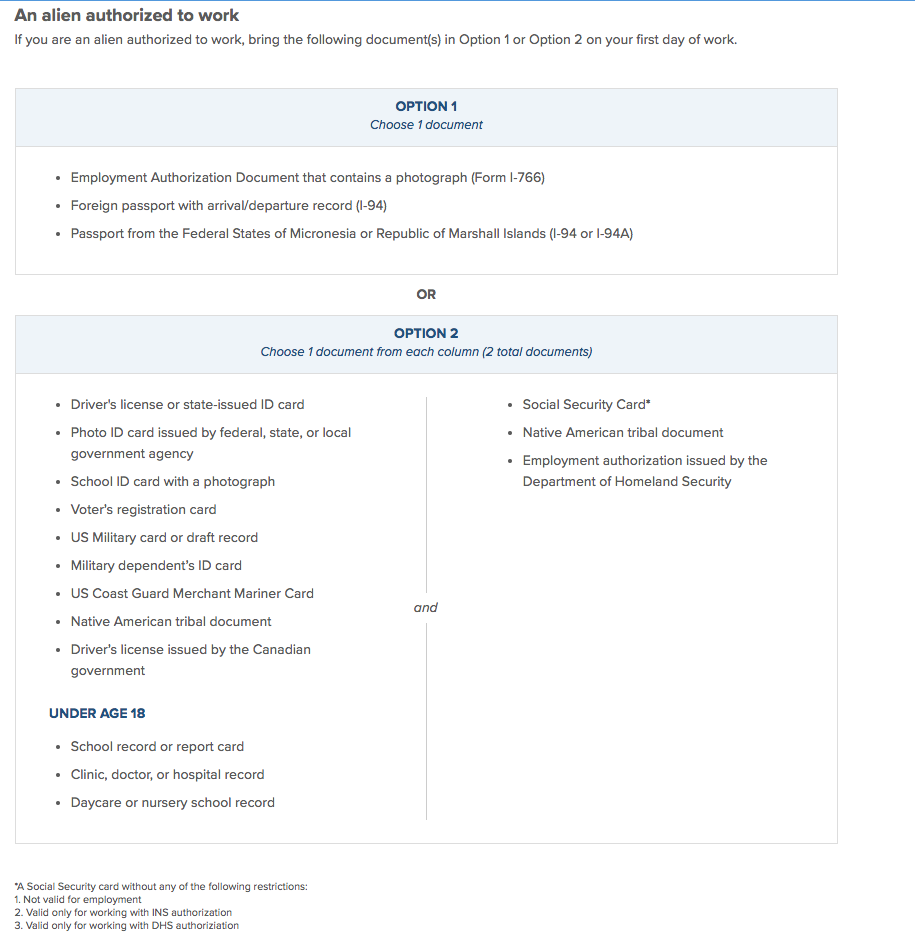
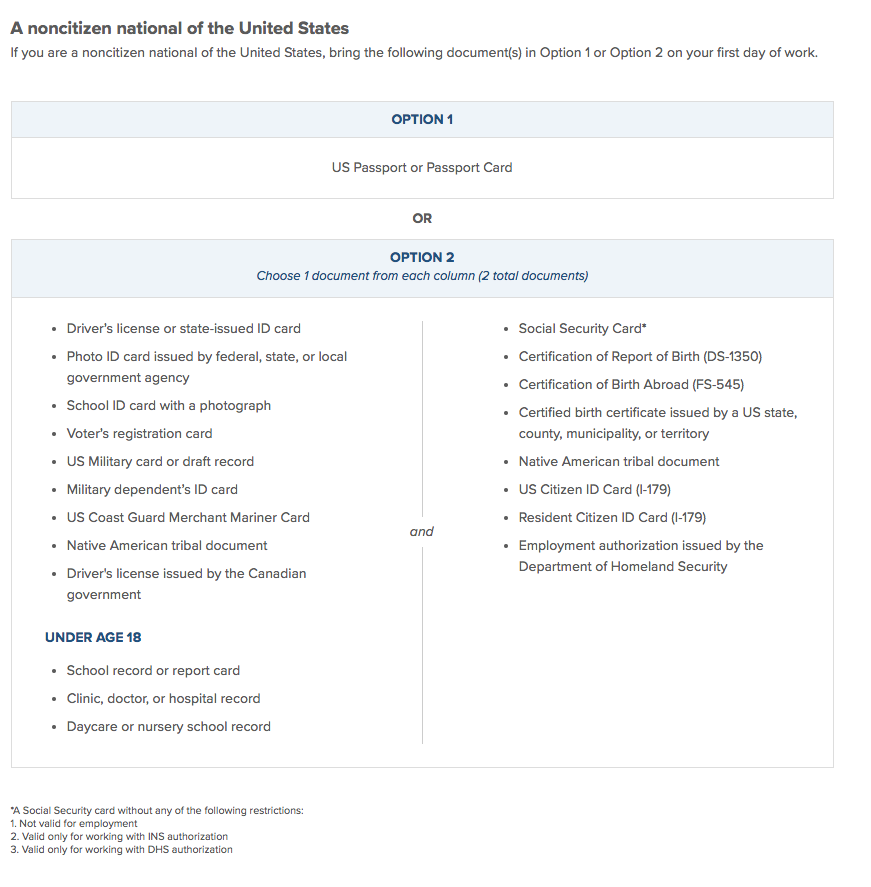
Form I-9 is used to prove that each new hire is allowed to work in the United States.
After the employee finishes self-onboarding, you’ll get email and Home page reminders to complete your part of Form I-9.
The law says you must verify the employee’s identity and work eligibility by their start date.
On the employee's start date, sign in to your Gusto admin account.
Click the Complete Employee I-9 sticky note.
Review your new employee’s proof of identification documents that they have physically handed to you.
For more info on the required documents, scroll to "Eligibility document requirements" in this article.
Select which identification and work authorization documents you reviewed.
Click Save & Continue.
Enter the information seen on the identification and work authorization documents.
Click Save & Continue.
Enter your full name, your title at the company, and select I agree to electronically sign this form.
Click Sign.
-
The type of documentation needed to prove employment eligibility depends on the employee's status in the United States. Documents must be current and not expired.
For more info on these requirements, check out the official I-9 form on the government website.